
Starting a siphon to move water from one container to another is a basic function in aquarium-keeping. Among other random uses, we use it in water changes, emptying or filling an aquarium, acclimating new livestock, and making filters work correctly. Since it is something that we use so often – especially in a retail environment like That Fish Place, it can be one of those actions that we take for granted and just assume everyone knows how to do but everyone has to be taught before they know, right? So here are some tips and tricks to have you siphoning like a pro in no time.
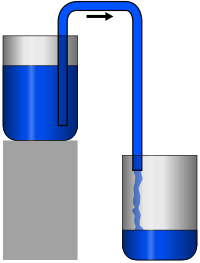
Uploaded to Wikipedia Commons by user Tomia
How it works
Before we discuss how to do it, it helps to know what is happening. A siphon uses a vacuum inside of the tubing to move liquid in a way the same as using a straw to drink. When you use a straw, you suck on the end to remove the air from the tube. As the air is removed, there is a vacuum inside of the straw and the liquid in the cup moves up to fill the space. If there is a hole or crack in the straw or if your mouth isn’t completely sealed around the end of the straw, it won’t work.
Instead of moving the water up a straw, a siphon uses gravity to move water from a container at a higher elevation down into a waiting lower-level bucket or other container. When a vacuum like the straw is created in the tubing, the water rushes in to fill it and gravity keeps it going into the lower container until both are even or the siphon is “broken” by allowing air to get into the tube (usually just by removing the higher end from the water). It is creating that vacuum that can be the tricky part for aquarists.
- Method 1: By mouth
- I’m going to get this one out of the way because it is the most common but also the least adviseable. Its easy, its quick, we’ve all done it…and most of us have ended up with a mouthful of aquarium water in the process at some point. This isn’t the safest method and is why every gas pump you use will have big “do not siphon by mouth” warnings on them. In this method, the higher end (End A for the rest of this blog and the left side of the graphic above) is put into the aquarium and the lower end (End B and the right side of the graphic) is held below the level of End A. You would then put your mouth over End B, suck on it like a straw under the water starts flowing and release it into the bucket before getting a mouthful of it. There is a risk of getting anything left in the tube in your mouth as well as anything in your aquarium water; DO NOT use this method if you have medicated or used any other chemicals in your aquarium!!
- Method 2: Submersion
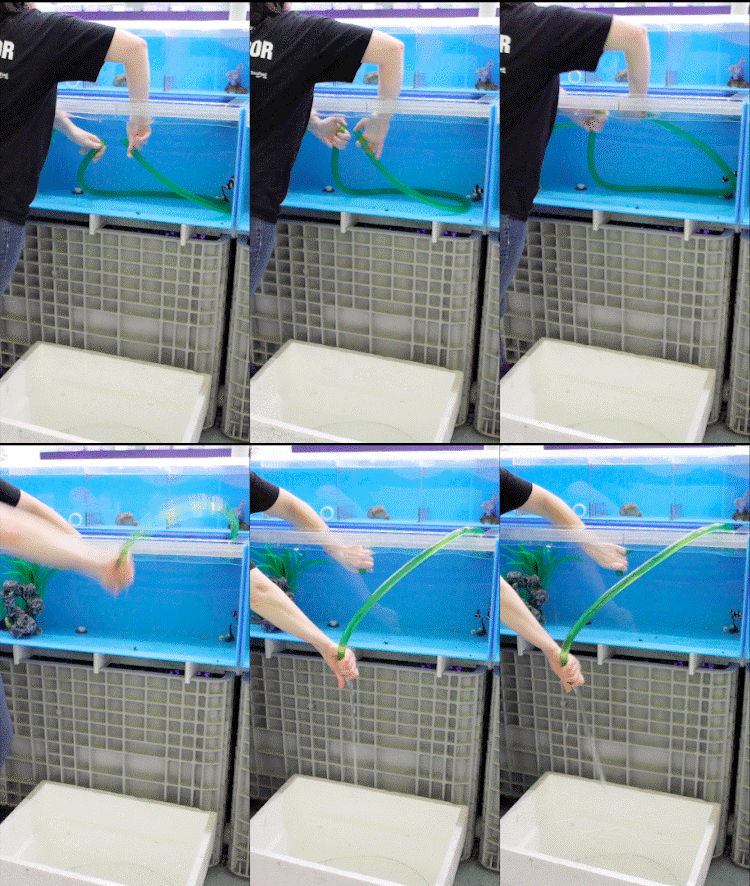
- In this method, we start off with the air removed from the tube by completely submerging the tube in the aquarium first. Once all the air is out, plug both ends with your hand or a finger and remove End B from the water. Once End B is lower than End A and over your second container, let go of both ends. The tube would then empty into the bucket and start the siphon from the aquarium. Alternatively, you can also fill the tube with water first if you can’t fit it safely into the aquarium to submerge it; just hold the ends closed until you have them in place. This method tends to work better with slightly larger tubing (0.5” diameter or more) rather than thin airline tubing like those used for acclimation.
- Method 3: Power-starting
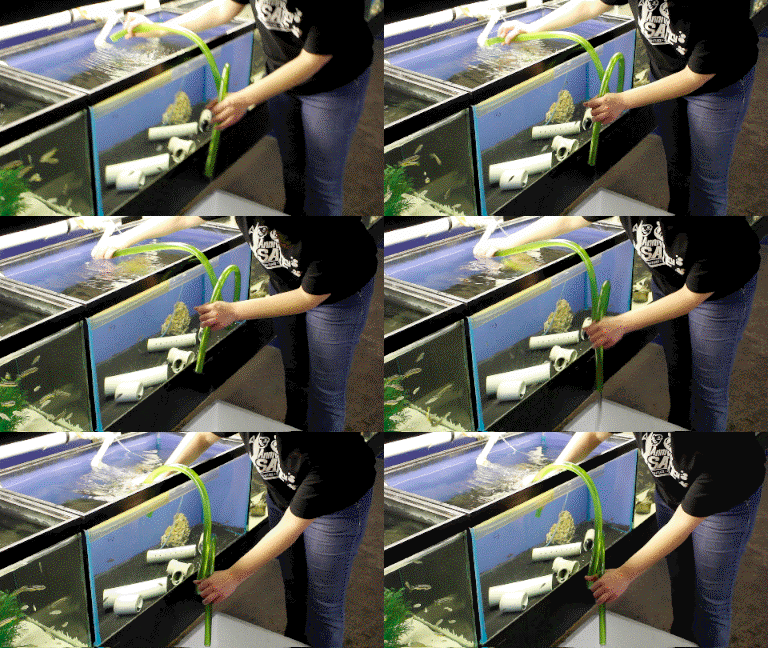
- Instead of drawing the air out through End B, this method forces it out from End A. If you have a powerhead or pump in the aquarium or a powerful output into the tank, you can use that to start the siphon. Hold End A up to this source and seal it as tightly as possibly with your hand until the water is coming out of the other end of the tubing. When you remove End A then (and get it in the water immediately without allowing any air in, if it is above the surface), you should have a good siphon going. Again, this tends to be more effective with larger-diameter tubing than the thin stuff. Some companies also make gravel vacuums that fasten directly to a faucet and use a similar method of starting the siphon “automatically”.
- Method 4: Siphon “Starters”
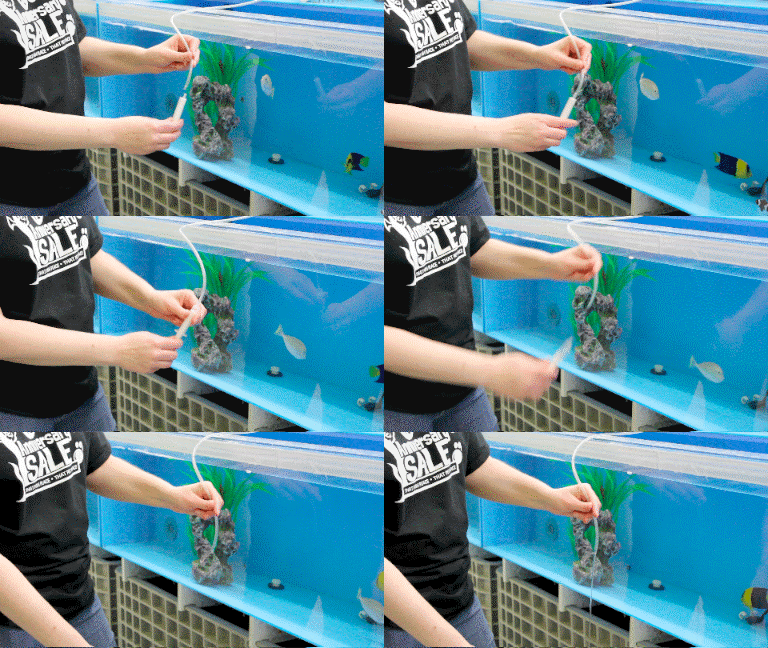
- Some gravel vacuums have starter bulbs built into them for this but if yours doesn’t, you can create your own. The built-in starter bulbs would act like your mouth and lungs in Method 1 by sucking the air out of the tube to start the siphon. For thin-diameter tubing like the airline tubing used for acclimation, you can use a syringe plunger like the ones that come with most test kits as a starter. With End A in the aquarium, put the tip of the depressed plunger into End B, then draw out the stopper. This sucks the air out of the tube and starts the siphon for you. While this one isn’t as effective for the bigger diameter tubing, you can try larger syringes, turkey basters, or irrigation bulbs from the health and first aid aisle at the drug store for this purpose.
The Breaking Point
To end your siphon, just take End A out of the water, raise End B higher than End A or allow air to get into the tube and it will be “broken”. Alternatively, if your siphon stops, check to see if any of those things have happened or if something is clogging up your tube. If you do notice that your gravel vacuum keeps getting clogged where the wider vacuum attaches to the more narrow tubing, just tilt it a bit more or tap it lightly and the heavier gravel should fall. If you are using your siphon to acclimate your new livestock, you can tie a loose knot in the end of the tubing or add a small valve to help control the flow once you’ve gotten your siphon started. If you have any questions or problems starting your siphon, or if you have a method that I haven’t mentioned, let us know!

-Step-1.jpg)
-Step-3.jpg)
-Step-4.jpg)
-Step-5.jpg)
-Step-6.jpg)
-Step-7.jpg)
-Step-8.jpg)
-Step-9.jpg)
-Step-10.jpg)
-Step-11.jpg)